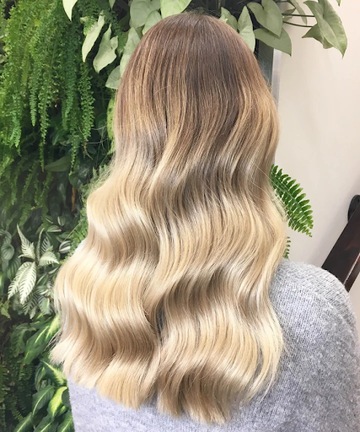
Your shortcut to mermaid-core waves that last
There’s something about waves that just hit different. The kind of hair that makes you feel like you’ve just strolled off a beach in Malibu or rolled up to a rooftop party looking effortlessly put-together (even if you got ready in, like, 15 minutes). They’re flirty, they’re cool, they go with literally everything—and honestly? They’re not going anywhere.
But here’s the tea: actually getting those waves isn’t always the vibe. We’ve all tried the sock hack, the overnight braids, the awkward curling-iron shuffle that leaves one side perfect and the other looking… suspicious. Cute in theory, chaos in practice.
That’s where the hair waver wand comes in. It’s basically the cheat code for waves that last longer than your iced latte. Instead of fighting with curls that drop by lunchtime or straight hair that refuses to bend, this little tool gives you that sweet spot—textured, bouncy, “did she just leave the salon?” energy.
And babe, it’s not just about the tool. The prep, the products, and the way you finish your style all make the difference between waves that slay and waves that flop. The right heat protectant, the right sectioning, and the right way to brush out (or not brush out) will completely change the game.
This is your all-access pass to getting it right. From exactly how to use a hair waver wand, to the mistakes everyone makes, to the profesh moves that keep your hair glossy and healthy, we’ve got you covered.
Why waves are the ultimate hair mood
Waves have officially graduated from “beach day hairstyle” to full-time lifestyle. They’re the ultimate in versatility: polished enough for a wedding guest ‘fit, relaxed enough for a coffee run in sweats, and flirty enough for a date night that calls for a little extra effort. Basically, they do it all—no wonder celebs, influencers, and your bestie’s bestie all swear by them.
Part of the obsession is how waves make hair look like it has its own personality. A little bend at the mid-lengths and suddenly you’re giving “model off-duty”. Add a deeper, glossy ripple and you’re straight into Hollywood bombshell territory. And the best part? You don’t need to commit to a full cut or color to get that energy—waves are a temporary style shift that instantly feels fresh.
Scroll TikTok and you’ll find endless tutorials (and probably lose an hour of your life to the algorithm). From Hailey Bieber’s soft bends to Zendaya’s red-carpet glam, waves are everywhere, and the hair waver wand is the tool making it possible for the rest of us to copy-paste the look at home.
Meet your bff—the hair waver wand
Curling irons can be… a lot. Too much wrist action, too much effort, and way too many chances of ending up with a Shirley Temple curl you didn’t sign up for. A hair waver wand, on the other hand, is low-drama styling at its finest. Clamp, release, repeat—that’s it. No gymnastics required.
TikTok has basically turned wave wands into a cultural moment. One scroll and you’ll spot creators taking hair that looked “meh” five seconds ago and flipping it into full-on “she tried, but in a cool way” waves. It’s quick, it’s satisfying to watch, and the results actually last.
What makes it even better is how universal it is. Straight hair gets movement, flat hair suddenly feels fuller, and thick hair looks like it can finally breathe. TYME’s irons deliver salon-level shine while they wave, so you end up with hair that looks styled—not scorched.
The result? Relaxed baddie, rather than “overplanned curls that won’t relax.” And honestly, that’s the mood we’re all going for.
Prepping your hair like a professional
Before you even touch a hair waver wand, the prep is everything. Waves hold longer, look shinier, and—bonus—your hair actually stays healthy. Here’s how to set yourself up.
1. Start fresh(ish)
Waves grip best when your hair isn’t freshly washed. Day-two strands are the sweet spot, but if you need to wash, go light on conditioner so your hair has a little natural texture to hold onto.
2. Detangle without drama
Knots are the enemy of smooth waves. Run a wide-tooth comb or a paddle brush through your hair to make sure sections glide through the wand without snagging.
3. Spray it, don’t skip it
Heat protection isn’t optional at ALL. The moisture & hydrate spray from Lauren Ashtyn Collection shields your strands from heat while keeping them soft and shiny. It’s basically a SPF, but for your hair.
4. Dry it down
Never clamp damp strands unless “frazzled ends” is the look you’re going for (spoiler: it’s not). Rough-dry until your hair feels completely dry, then you’re good to go.
5. Add a little grip
A texturizing spray or lightweight mousse will give your waves staying power without making your hair crunchy. This step is your secret to waves that actually last past happy hour.

How to style waves with a wand
Once your hair is prepped, it’s showtime. Here’s the play-by-play for getting those swoon-worthy bends with a hair waver wand.
1. Divide and conquer
Clip up the top half of your hair and start with the bottom layers. Working in sections makes it easier, faster, and way less overwhelming.
2. Clamp, don’t twist
Place the wand near the roots, clamp down, and hold for a few seconds. Move the wand down the same section and clamp again, lining it up so the “wave” flows naturally. Keep going until you reach the ends.
3. Switch directions for dimension
If you clamp every piece the same way, your waves can start to look a little too uniform. Flip the direction of the wand every other section—it keeps things modern and adds that effortless, beach-chic vibe.
4. Face-framing finesse
The money pieces at the front deserve special treatment. Angle the wand slightly away from your face for that flattering, open look you see on runways and TikTok tutorials.
5. Work with your texture
Fine hair? Shorter hold times will give soft movement. Thick hair? Hold a few seconds longer so your waves actually last. Play around until you find your sweet spot.
6. Cool before you touch
Let each section set before running your fingers through. It’s tempting to fluff immediately, but patience pays off—the waves will stay bouncier all day.
7. Break them up
Once everything’s waved and cooled, shake it out. Flip your head, rake through with your hands, or use a wide-tooth comb. The goal isn’t perfect ripples, it’s lived-in texture.
The beauty of a wave wand is that it does all the hard work for you. No awkward wrist flips, no guessing games—just glossy, S-shaped texture that looks like you woke up in Malibu.
Mistakes to avoid when waving your hair
Even the best tools can’t save us from rookie errors. These are the wave-killers you’ll want to dodge.
1. Skipping protection
Going in without a heat spray is basically begging for crispy ends. Always mist before you plug in.
2. Clamping damp hair
Water + hot plates = steam damage. Translation? Frazzled, fragile strands. Dry it completely before you wave.
3. Using sections too big
Chunky pieces won’t heat evenly, leaving you with lopsided texture. Stick to one-inch sections for consistency.
4. Over-clamping the ends
Running the wand all the way down to the very tips can make them look flat and crunchy. Stop just shy of the ends for a more natural finish.
5. Forgetting to switch it up
Every section waved in the exact same direction can look stiff and dated. Alternate your clamping direction for a more effortless flow.
6. Touching too soon
Running your hands through hot waves is like smudging wet nail polish. Let them cool before you mess with them.
Avoid these, and your waves will look glossy, modern, and—most importantly—stay put.
Finishing touches that make waves last
Once you’ve waved, it’s all about how you set the look. A couple of quick extras make the difference between waves that fall flat by lunch and waves that stick around all night.
1. Lock it in
Hairspray is the wave’s best friend. The Moroccanoil luminous hairspray gives flexible hold with zero crunch—so your waves move with you, not against you.
2. Add shine
For that glossy, editorial finish, smooth a drop of Argan oil through the ends. It keeps flyaways in check and makes your hair look like it just walked off set.
3. Play with texture
Chasing volume? Flip your hair forward, scrunch, and mist with a texture spray. Going glam? Brush everything into soft, uniform waves and polish the top layer with a touch of serum.
The right finishing move changes the whole mood. It’s the small stuff that keeps your waves looking intentional and makes them last way past happy hour.

Ready to ride the wave?
Perfect bends, glossy texture, that effortless “oh, this? just my natural hair” energy—it’s all within reach with the right hair waver wand. The beauty of waves is how versatile they are: soft ripples for a coffee run, deeper bends for date night, and shiny, brushed-out glam for when you’re feeling like the main character.
Once you’ve got your prep sorted, your technique down, and your finishing products in play, the rest is pure fun. No more failed sock curls, no more braids that leave you with crimps—just fast, foolproof waves that actually last.
Because good hair days aren’t meant to be rare—they’re meant to be routine.


