Because good hair days shouldn’t need a booking
We all know that feeling: you leave the salon and suddenly you’re in a shampoo commercial. Hair is shiny, full, swishy in a way that makes you toss it just because you can. Fast-forward to the next morning and you’re standing in front of your mirror, brush in one hand, blow-dryer in the other, trying to recreate the magic. The result? Usually less “effortlessly bouncy” and more “why does my arm hurt?”
Here’s the secret nobody at the salon tells you: the blowout isn’t witchcraft, it’s a method. With the right prep, tools, and a little patience, you can absolutely pull off a salon blowout at home. It’s about tension, direction, and knowing a few insider hacks that make your hair behave. Once you learn them, the salon becomes optional.
Why the salon blowout is hard to fake
There’s a reason salon blowouts feel different. Stylists aren’t just waving a brush around, they’re combining three things most of us don’t have on hand at home: tension, precision sectioning, and perfect heat control. Every strand gets pulled taut at just the right angle, the brush rotates with just the right wrist flick, and the dryer nozzle hits at just the right distance. That’s what creates bounce, shine, and shape that lasts.
At home, the reality is less glamorous. You’re juggling a brush in one hand, a dryer in the other, arms already aching by the time you reach the back of your head. You rush sections, skip product, or default to blasting hot air all over. The result is hair that looks styled… but not like you walked out of a salon.
The good news: it all comes down to method and the right tools. With the right prep and a little practice, you can mimic the same pro tricks: proper sectioning, steady tension, and targeted heat. Once you nail that combo, the gap between salon and home suddenly gets a whole lot smaller.
How to get a salon blowout at home (the prep)
A great blowout starts in the shower. If you want that signature bounce and gloss, the products you reach for first matter just as much as the tools you’ll use later.
Choose lightweight wash-day products. Heavy conditioners can weigh hair down before you’ve even started styling. Opt for a lightweight volumizing shampoo and conditioner that cleanse without coating strands in residue. The goal is lift and movement, not slip that flattens at the root.
Layer in styling support. Before picking up any hot tool, mist on a heat protectant—non-negotiable if you want shine without damage. Then, build in volume. A golf ball–sized amount of mousse scrunched through damp hair creates a subtle framework for body. If your roots tend to collapse, a root-lifting spray will give them staying power.
Rough-dry with purpose. Don’t dive straight into brushwork. Flip your head upside down and rough-dry until hair is about 70% dry. This helps lift roots away from the scalp and saves time once you start styling. For even more lift, direct the airflow upward as you dry.
This prep routine may feel like extra steps, but it’s the secret sauce behind how to get a salon blowout at home that actually lasts. By the time you pick up your brush or iron, your hair will already have volume waiting to be shaped.
The tools that make a difference
A true salon blowout is equal parts technique and tools. Stylists have access to professional dryers, perfectly balanced brushes, and hours of practice. At home, it’s about picking tools that make the process easier—and knowing which ones suit your skill level.
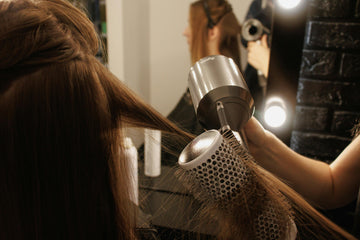
The classic combo: round brush + blow dryer
This is the gold standard. A round brush creates tension while the dryer’s nozzle directs heat along the hair shaft, smoothing the cuticle for shine. It’s also the trickiest method to master, requiring coordination and strong arms. If you’re confident with brush-and-dryer choreography, this route gives you the most salon-like results.
The beginner-friendly option: blow dry brushes
If juggling tools feels impossible, blow dry brushes simplify the process. They combine hot air and a round barrel in one hand, so you can dry, smooth, and shape in a single motion. For anyone still building confidence, they’re a shortcut to a bouncy finish without the arm ache.
The multi-tasking approach: styling irons
Flat irons aren’t only for poker-straight hair. With the right wrist movement, they can mimic the curves of a blowout, adding bend at the roots or a flick at the ends. Multi-use irons give you freedom: go sleek, wavy, or full-bodied depending on the technique. The TYME Iron Pro, for example, is built with this versatility in mind, letting you switch from smooth to voluminous without swapping tools.
Whether you stick with the traditional brush-and-dryer, reach for a blow dry brush, or master a multi-use iron, the key is consistency. Once you’ve found the method that feels natural, your at-home blowouts will start to look—and last—like the salon version!
How to achieve the salon blowout at home
Blowouts look effortless when stylists do them, but behind the bounce is a system. Recreating that polish means breaking the process into simple steps and giving each one its moment. Here’s your guide to pulling off an at home salon blowout without the arm cramps or frustration.
1. Start with sections
Think like a pro and divide your hair into quadrants: left, right, crown, and back. Clip each section up and out of the way. This not only makes the process manageable, it ensures every strand gets the same attention. Skipping sections is the fastest way to lose volume.
2. Work from the bottom up
Release the lower layers first and leave the crown for last. Starting underneath creates a strong base of shape and lift. It also stops the top layers from collapsing onto hair that’s still damp.
3. Build tension with a round brush
This is the cornerstone of blowout volume. Wrap a one- to two-inch section of hair around your brush, keeping it taut, then follow the brush with the dryer nozzle angled downward. The tension smooths the cuticle for shine, while the rolling motion creates bounce. For extra lift, over-direct the section—pull it forward or upward before letting it fall back.
4. Swap to a blow dry brush if needed
If handling a brush and dryer feels like a circus act, a blow dry brush simplifies things. Roll and pull just as you would with a round brush, but let the hot air built into the barrel do the work. Slowly roll the brush from root to end, giving each section a little twist at the bottom for that signature curve.
5. Fake it with a multi-use iron
Prefer to skip the dryer altogether? A styling iron can mimic the same effect. Use a subtle C-bend at the roots to lift, then flip the ends out or under to create blowout-style movement. Alternating the direction of flips adds body and stops the style from looking too uniform. The trick is in the wrist: a small twist changes the whole shape.
6. Lock it in
Finish each section with a blast of cool air to set the shape. At the crown, pin a few large sections in place while they cool for extra height. Around the face, angle your brush or iron slightly away to create that soft, face-framing lift salons are known for.
Done right, the whole routine doesn’t just smooth your hair, it changes its architecture. With patience and practice, your living room mirror will start to feel suspiciously like a salon chair.
Hacks for making your blowout last
The only thing better than a fresh blowout is one that actually lasts. With a few smart tricks, you can stretch that just-styled look into tomorrow (and maybe even the day after).
-
Blast it with cool air: Before you move on from each section, give it a quick hit of cold air from your dryer. The cool shot helps lock hydrogen bonds back into place, setting the shape so your volume doesn’t deflate by lunch.
-
Pin and let it chill: For extra lift at the crown, wrap freshly styled sections into loose pin curls and let them cool before releasing. It feels retro, but it’s the trick stylists swear by to create long-lasting height.
-
Choose the right finish: Skip heavy sprays that weigh hair down. A texturising spray or lightweight hairspray adds hold and grit without sacrificing movement. Think flexible, not stiff.
-
Sleep strategically: Tie your hair in a loose, high bun before bed and swap your cotton pillowcase for silk. Less friction means less frizz, and your volume will still be there in the morning.
-
Quick refresh: On day two, dry shampoo at the roots revives lift, while a quick C-bend or flick with a flat iron refreshes any sections that have fallen flat.
With a little care, your blowout doesn’t have to be a one-day wonder.
Why a salon blowout at home is totally doable
The truth is, you don’t need a standing salon appointment to enjoy bouncy, glossy hair. Once you understand the basics—tension, direction, and the right prep—a salon blowout at home becomes less of a mystery and more of a routine you can actually pull off.
Consider it practice over perfection. The first few times might feel clumsy, but soon your hands will know exactly how to angle the brush, when to flip the ends, and how to finish with that pro-level lift at the crown. Add in the right tools—whether that’s a blow dry brush like the TYME Iron Air or a multi-use styler like the TYME Iron Pro—and you’ll cut the learning curve dramatically.
So experiment, adjust, and keep at it. With a little consistency, your mirror can give you the same payoff as a salon chair (minus the appointment and the bill).