You don’t need rollers or mousse—just a better technique
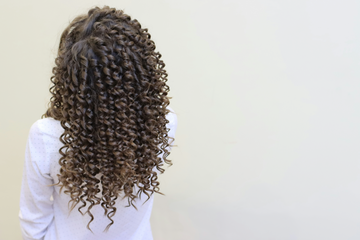
Big hair is back, babe, and TikTok’s been screaming it. From Sabrina Carpenter’s choppy, flippy ends to those bouncy 2000s blowouts filling every FYP, “flat” is officially out. The IT girls of 2025? They’re wearing hair like it’s part of the outfit—lifted roots, flared layers, and a little bend that says, I didn’t try that hard (but I did).
And while everyone’s reaching for hot rollers and round brushes, here’s a secret: your flat iron might just be the ultimate volume hack. Yep. The same tool you’ve been using since high school to press your hair into submission? With the right technique, it’s a backstage pass to soft volume, swoopy bangs, and ends that actually bounce.
The secret? It’s all in the angles—and the tool. Multi-stylers like our TYME Iron Pro were *made* for this moment. One flick of the wrist and suddenly you’ve got bend, lift, and hold without ever switching tools. Add a solid heat protectant (hi, this one) and you’re golden.
So, if your layers are layered, your FYP is full of big-hair inspo, and you’ve been wondering how everyone’s hair suddenly got so alive, this one’s for you. These 10 flat iron volume hacks are quick, scroll-proven, and—most importantly—they actually work.
Flat irons aren’t the enemy of volume—they just got cooler
Somewhere between 2007 and now, flat irons went from “must-have” to “meh.” They were blamed for limp hair, fried ends, and middle school flashbacks. But here’s the plot twist: they didn’t get worse—we just got better at using them.
TikTok’s been busy resurrecting all things Y2K and ‘90s, but this time, it’s not crunchy curls or stiff flips. It’s bendy, touchable, bouncy volume—and flat irons are quietly becoming the hero that Pam Anderson would be proud of.
And don’t get it twisted: this isn’t the era of flat-ironing your bangs into a triangle and walking away. This is about curve-ins at the ends, curtain bangs with movement, and styles that mimic a profesh blowout without even picking up a round brush.
Yes, Sabrina Carpenter's layered, lifted glam may have you thinking rollers or hot brushes are the only way, but spoiler alert: those same results? Totally possible with the right flat iron and a little wrist finesse. Especially when you’re working with something like the TYME Iron Pro—designed to straighten and curl, without pulling your hair flat as a pancake.
It’s time to rethink what your iron can do. Because “straight” doesn’t mean limp anymore—and this little tool? It’s got some volume tricks up its (ceramic-titanium) sleeve.

Prepping for volume—The secret sauce before you even plug in
Before you start flipping ends or lifting roots, we need to talk prep—because volume doesn’t just come from your technique. It starts in the shower (yep) and builds with every product and pass after that.
Step 1: Start clean, but not TOO clean
Fresh hair is great, but hair with a little grip gives better hold and volume. Think one-day post-wash, or use a texturizing shampoo that doesn’t leave you squeaky clean. You want your strands light, not stripped.
Step 2: Protect at all costs
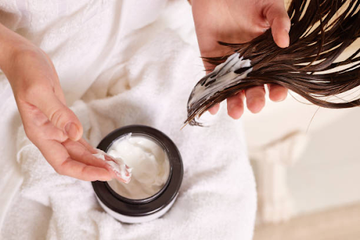
This is non-negotiable. Heat protectant is a serious NEED and actually sets the stage for smoother passes and longer-lasting shape. The Lauren Ashtyn Collection Heat Protectant pulls double duty: it guards against heat up to 450°F and adds a light touch of hydration so your ends stay shiny, not singed.
Step 3: Divide and conquer
Sectioning isn’t just for blowouts. Breaking your hair into layers lets you target the areas that need the most volume—aka the crown, roots, and those outermost layers. Use clips, work in clean zones, and resist the urge to rush.
Step 4: Know your plate game
Not all irons are created the same. If you’re using the TYME Iron Pro (cough cough, why wouldn’t you be), you’ve already got titanium plates, which deliver fast, even heat (aka: no sizzling one section while another stays limp). Ceramic tends to be gentler and better for fine or color-treated hair, but titanium’s where it’s at for shaping and holding volume.
TLDR? The better you prep, the harder your hair works for you. We’re not building a blowout—we’re engineering hold, height, and bend that actually stays. And it starts right here.
10 flat iron hacks that actually hit
1. Flip your ends out instead of under
The classic “under curl” is basically the hair equivalent of playing it safe—but flipping your ends out? That’s where the cool factor lives. Outward-facing ends add lift, dimension, and that effortless, off-duty vibe you see on street-style girls and IG baddies. Start your pass mid-shaft, then twist your wrist away from your face as you glide down.
TYME tip: hold the bend for two seconds before releasing to help it stay. Bonus points if you follow with a soft-bristle brush to break it up for that light, fluffy finish.
2. Bend at the mid-lengths, not the roots
We get it—you want root lift. But clamping your iron too close to the scalp usually leads to creases or heat damage. Instead, work your flat iron in the mid-length zone. Take a section, clamp around your ear level, and gently flick your wrist to build a curve through the body of the hair. This technique adds shape and movement without overstyling. It’s especially good for reviving second-day hair when the roots are flat but the ends still have life.
3. Use the clamp-and-bump trick at the crown
For those days when your hair feels like it’s melting into your scalp—this is your fix. Lift a section at the crown straight up, clamp about an inch from the roots, and do a quick bend upward (we’re talking slight here, not full ON curl). Hold for just a second and let it cool before letting the hair fall. It gives you a mini root lift without any teasing or hairspray buildup. For extra hold, try layering this hack with a spritz of dry shampoo at the roots.
4. Start at an angle, not flat
How you hold your flat iron makes a massive difference. Instead of going in with your iron parallel to the ground (aka flat), tilt it diagonally when you clamp your section. This angle helps shape the hair in a more natural, flowing curve—especially around the face. Think of it like contouring for your layers: it frames, lifts, and softens all at once. Try this with curtain bangs or shorter front layers to get that flicked, soft-blowout look.
5. Go over-curved, then brush out
Don’t be afraid to go big at first—because flat iron curls relax. If you’re aiming for soft bends, start by giving your section a stronger shape than you think you need. Once the hair cools, brush it out gently with a paddle brush or wide-tooth comb. This lets the volume settle into a soft, airy texture instead of droopy waves. Want more hold? Pin each section while it cools, then release once your full head is styled.
Pin curls are everywhere right now, and believe us—they SERVE.
6. Alternate directions to build texture
Flat iron curls all going the same way = stiff, overly styled hair. Instead, switch up your direction: curl one piece toward your face, the next one away. This keeps the hair from clumping together and gives you that dimensional, lived-in texture everyone’s going for. It’s especially helpful for fine hair that tends to fall flat—alternating adds volume and movement without heat stacking the same section over and over.
7. Let your sections cool lifted
Heat shapes your hair—but cooling locks it in. After each pass with your flat iron, gently lift the section and hold it in place for a few seconds while it cools. You can even clip it up temporarily if you’re doing your whole head. Think of it as a mini set: it helps your volume stay instead of collapsing the second you step outside.
8. Avoid too-small sections
It’s tempting to go micro when you want precision—but smaller isn’t always better. Styling too-thin sections means more heat, more time, and more risk of flatness. For volume, stick to 1 to 2-inch sections. They allow the heat to distribute evenly without over-smoothing your hair. And if you’ve got layers? Try stacking the top and bottom pieces together in the iron to unify your shape.
9. Use less pressure
Repeat after us: you are *not* making a panini. Clamping your flat iron too tightly flattens the cuticle (and all your volume along with it). Instead, use light to moderate pressure—just enough for the heat to do its thing without squashing your shape. A looser grip also lets you curve more naturally, making the hair feel lighter, softer, and more touchable.
10. Refresh volume without rewashing
Flat ironed styles usually fall flat by the evening (cry)—but that doesn’t mean you have to start over. A root-boosting dry shampoo or volumizing texture spray can bring the bounce back, especially when applied with your head flipped upside down. Massage it in with your fingertips, then hit a few sections with a warm (not hot) flat iron pass using the clamp-and-bump technique. And don’t forget a lightweight protectant if you’re applying more heat—your hair still deserves care on round two.

Flat iron ≠ flat hair. Period.
Let’s retire the myth that flat irons are only good for pin-straight styles and start treating them like the multi-hyphenate tools they really are. You’ve got 10 hacks now that don’t just add volume, they unlock a whole new attitude—whether you’re going for subtle bend or full-blown drama.
These tricks work because they play to your hair’s natural movement, not against it. They’re made for choppy layers, fine strands, thick blowouts, or anything in between. No rollers, no root sprays, no hot air barrels required—just smart styling and the TYME tools that make it easy (not to be biased, but they really are the ultimate multitasker 😉).
Now next time your hair feels a little...meh? You’ll know exactly what to do. Now go make some noise with that hair, babe. Big volume looks good on you.