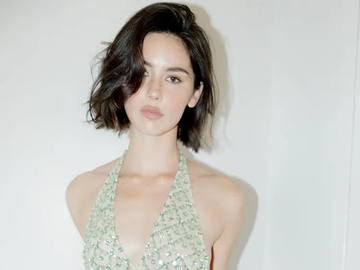
Your straightener’s living a double life…
Flat irons have been typecast for years as the “make it sleek” tool. Plot twist: with a flick of your wrist, your trusty straightener doubles as a curling wand. Picture undone waves, shiny spirals, or effortless bends—all from the same iron you use to flatten frizz before a night out. It’s the ultimate undercover multitasker, saving space in your kit and time in your routine.
Whether you want off-duty texture or full-on red-carpet gloss, the technique is simple once you get the hang of it. Master the twist-and-glide, and you’ll never look at your straightener the same way again.
Why bother curling with a flat iron?
Because it’s low-key genius. A curling iron can only do curls. A flat iron? That’s the shape-shifter of the hair world. One tool, endless looks. You can go from polished bends to undone texture without switching gadgets. The finish is less “pageant spiral,” more “I just woke up on the French Riviera.” Flat iron curls also tend to last longer because you’re sealing the curl as you glide, which helps them hold even in humidity.
And let’s not forget practicality—it saves suitcase space when you’re traveling, makes quick touch-ups easier, and works on both long and short cuts. Consider it your beauty hack for waves that look chic but never try-hard.
What you need on standby
Curling with a flat iron isn’t rocket science, but having the right kit on hand makes all the difference.
-
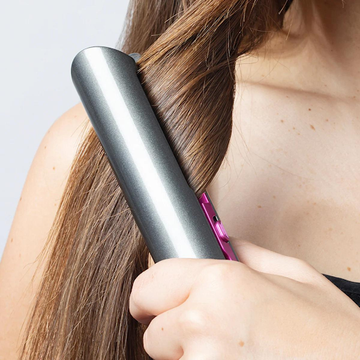
A flat iron with rounded plates – Flat plates straighten beautifully, but rounded edges are what let you twist without kinks. Around 1 inch wide is the sweet spot: small enough to wrap sections neatly, big enough to glide without snagging. If you’ve got a lob, you can go slightly bigger; for pixies and bobs, stick to smaller plates.
-
Heat protectant – Think of it like your seatbelt. You wouldn’t drive without one, and you shouldn’t style without this. A good spray shields strands from heat damage, keeps colour fresher, and even helps curls hold longer.
-
Clips – Not always glamorous, but always essential. Sectioning your hair means you’re only working with what’s in your hands, not battling a full head at once. It speeds things up and gives more consistent curls.
-
Brush or comb – Smooth hair equals smooth curls. A paddle brush works for detangling, while a fine-tooth comb can help distribute product evenly and refine smaller sections. Consider it as your pre-styling polish, making sure every curl starts sleek, snag-free, and ready to hold its shape all day.
- Finishing touches – Products make or break the final look. A medium-hold hairspray keeps curls intact without crunch. Texturizing spray adds grip for that cool, beachy look. A serum or oil glosses everything over, so you get shine instead of frizz.
Special mention: TYME Iron Pro
While most flat irons were designed with straight styles in mind, the TYME Iron Pro was built to blur the line between straightener and curler. Its angled plates and rounded edges mean you don’t have to fight the tool to get a smooth bend—the design naturally guides hair into a curl as you glide. For short cuts, it catches layers without slipping; for longer lengths, it creates polished waves with less wrist acrobatics. It’s essentially proof that a straightener can be engineered for multitasking, making it a favourite among people who like switching styles without switching tools. |

How to curl your hair with a flat iron (step by step)
Step 1: Start with prep
Curls only behave as well as the canvas you give them. Always start with completely dry hair—damp strands and 200°C plates are a recipe for sizzle, not shine. Mist on a heat protectant from mid-lengths to ends, then brush through to distribute. This not only shields against damage but helps curls set more smoothly. Mood optional, but a Beyoncé playlist never hurts.
Step 2: Section like a pro
Divide and conquer. Clip your hair into top and bottom layers so you’re only working on what’s in your hand. Smaller sections give bouncy, defined curls; larger ones create soft waves. The goal is consistency; it’s easier to add texture later than fix one rogue super-tight curl in a sea of waves.
Step 3: Clamp and angle
Start at the root or just below, depending on how much lift you want. Clamp lightly—enough to grip, not enough to leave clamp marks. Angle the iron slightly away from your face to open up the shape (no one wants curls folding inward like curtains).
Step 4: Twist and glide
Here’s where the magic happens. Turn the flat iron a half rotation for relaxed waves or a full rotation for a defined curl. Then slowly glide the iron down the section in one smooth motion. The speed controls the curl: slower for drama, faster for subtle bends.
Step 5: Hands off
Once the curl drops out of the iron, resist the urge to touch it. Catch it in your palm and let it cool in shape—this is when the curl sets. Ruffling too soon will undo all your work.
Step 6: Keep going
Repeat throughout your head, alternating directions if you want natural texture, or keeping them uniform for red-carpet glam. If you’re curling short hair, you may only need a flick at the ends; for longer hair, vary your angles for dimension.
Step 7: Seal the deal
Once all sections are cool, shake curls out with your fingers or a wide-tooth comb. Then mist on a flexible hairspray for hold, scrunch in a little texture spray for grip, or finish with a drop of serum for shine. Glossy, bouncy, done.
Hacks for different curling styles
Loose waves
Think off-duty model energy. Take big sections, twist the flat iron only halfway, and glide quickly down the length. The result is a barely-there bend that looks like you rolled out of bed with perfect texture (even though we both know you didn’t).
Defined curls
For days when you want bounce that lasts. Work in smaller sections, give the iron a full twist, and glide more slowly so the curl has time to set. The finish is polished but not stiff; a style that moves with you instead of freezing in place.
Beach waves
Your shortcut to “just got back from vacation” hair, minus the saltwater. Alternate the curl direction with each section and leave the ends straight for that tousled, surfer-girl finish. A spritz of texture spray makes it even more believable.
Hollywood glam
Channel your inner silver-screen siren. Curl each section in the same direction, let them cool, then brush through gently to merge the spirals into soft, uniform ripples. Add shine spray and you’ve got full-on red-carpet gloss.
Flat iron sins to avoid
We’ve all been there—mid-styling panic, rushing against the clock—but these mistakes are curl killers (and sometimes hair killers).
✗ Cranking heat to 450°F “just in case.”
Stop. More heat doesn’t mean better curls; it just means split ends on speed dial.
✗ Clamping like you’re crushing a soda can.
A light grip is all you need. Anything tighter just dents the hair.
✗ Moving so slowly you can smell your hair.
If you hear sizzling, you’re cooking, not curling. Keep the glide steady but swift.
✗ Finger-combing curls before they cool.
Rookie error. Let curls set in shape before ruffling—patience pays off.
How to make flat iron curls last longer
Flat iron curls are gorgeous, but only if they stick around past your morning coffee. Here’s how to lock them in:
✔ Heat protectant first. Always.
It smooths the cuticle, which actually helps curls hold while guarding against damage.
✔ Pin curls while they cool.
If you want all-day bounce, clip curls to your scalp until they’re cool to the touch, then release.
✔ Alternate curl directions.
The mix keeps curls from merging into one big wave, giving that messy-chic texture.
✔ Wait until you’re finished to add product.
Spraying too soon makes curls collapse. Style first, set after.
✔ Serum at the end.
Just a drop for shine—any more and you’re in greasy, weighed-down territory.
FAQs, because we know you’re asking
Can any flat iron curl hair?
Technically, yes. But life’s a lot easier with rounded plates. They let hair glide smoothly and prevent those dreaded right-angle kinks.
What’s the best size flat iron for curling hair?
Around 1 inch (25mm) in diameter is the sweet spot. It’s versatile enough for both waves and curls. If you’ve got shorter hair, slimmer plates are easier to manoeuvre.
Will a flat iron damage my hair?
Not if you’re smart about it. Always prep with heat protectant, keep temps moderate, and avoid camping the iron in one spot. Treated right, your hair should stay shiny, not frazzled.
How long do flat iron curls last?
Anywhere from six hours to a full day, depending on your prep. Fine hair may need extra product or pinning, while thicker hair tends to hold on longer.
Curling iron vs flat iron?
Neither’s “better,” they’re just different. Flat iron curls look a little more lived-in, with that effortless, tousled texture. Curling iron curls tend to be more uniform, polished, and structured. Pick your vibe.
Flat irons: the undercover hair hero
Your flat iron isn’t just for silky-straight blow-out days, it’s basically the Swiss Army knife of hair styling. One tool can smooth, curl, wave, or bend depending on how you angle it, making it the ultimate multitasker for busy mornings or last-minute nights out.
Once you crack the wrist twist, the styling world opens up: beachy waves on Monday, glossy spirals by Friday, and effortless bends whenever you’re feeling low-maintenance. The best part is: You don’t need a bathroom cabinet full of gadgets to get the look!
For more tutorials, pro tips, and inspiration, head to the LifeTYME blog—your go-to for keeping hair healthy, shiny, and seriously chic.