
The ultimate flat iron S-waves guide for modern glam girls
Move over Hollywood, we can do it too
Margot Robbie is currently in her full glamour era. Like, owning it. And if you’ve seen her hair on the Wuthering Heights press tour this month, you already know exactly what we mean. Glossy. Sculpted. Soft but dramatic. The kind of waves that look effortless but also wildly intentional. The kind that make you pause mid-scroll and think, okay… I need to learn how to do that.
Those waves are S-waves. And yes, they’re back. Again. But this time they feel less red-carpet-only and way more wearable.
The thing about flat iron S-waves is that they look intimidating on paper. Perfect bends. Smooth curves. Zero frizz. No obvious curl pattern. It’s giving Old Hollywood, and Old Hollywood can feel… serious. But the modern version is softer, cooler, and surprisingly achievable at home. No Marcel iron. No glam squad. No sacrificing your hairline in the name of beauty.
So how do you actually do an S-wave without overthinking it or overheating your hair? Especially if you’re blonde and already side-eyeing your flat iron every time it hits 350 degrees? That’s exactly what we’re getting into.
Ahead, we’re breaking down the prep, the flat iron technique, and the small details that turn a “kind of waved” situation into real S-wave energy. The kind that holds its shape, feels touchable, and makes you look like you know your way around a heat tool.
Because great hair isn’t about doing the most. It’s about knowing the right move, at the right time, with the right tools. And once you get this one down, you’ll use it way more than you think.
What are S-waves and why they’re having a moment
S-waves are exactly what they sound like. A smooth, sculpted wave pattern that moves through the hair in a soft “S” shape instead of a spiral. Think less bouncy curl, more polished bend. Less beachy. More bombshell.
The kind of wave that looks intentional from every angle.
Unlike traditional curls that twist and loop, s waves sit flatter against the head and flow into each other. That’s what gives them that glossy, Old Hollywood finish. One wave melts into the next, creating movement without puff, volume without chaos, and drama without trying too hard.
So why are they everywhere again? A few reasons.
-
They sit right in the sweet spot between vintage and modern. Old Hollywood energy, but wearable enough for right now.
-
They photograph beautifully. No harsh curl lines, no frizz, just smooth, sculpted movement.
-
They last longer than loose curls, especially when you want a style that holds from first cocktail to last photo.
-
They work on almost every length and texture, from shoulder-grazing lobs to long, layered hair.
Another reason? Versatility.
S-waves can lean sleek and polished or soft and undone depending on how you finish them. You can tuck them behind the ears, pin one side back, or let them frame the face. They play well with bold lips, minimal makeup, and everything in between.
And then there’s the modern technique.
Today’s S-waves aren’t crunchy or shellacked. They’re touchable. They move. They feel current. Creating an s curl with a flat iron gives you more control and a smoother finish, which is why learning how to curl hair with flat iron has become such a go-to move.
Long story short? S-waves never stopped being chic. We just figured out how to make them cooler.
Why a flat iron is your secret weapon for S-waves
Here’s the honest truth.
S-waves don’t need more heat. They need more control.
And that’s exactly why a flat iron wins every time.
First, shape (because this matters)
S-waves aren’t curls. They’re bends. Smooth, deliberate bends that move back and forth in an “S” pattern rather than looping into a ringlet. That’s why curling irons can feel a little… wrong for this look.
A barrel wants to twist the hair.
An S-wave wants to flow.
That’s where flat iron s waves come in.
With a flat iron, you’re guiding the hair forward, then back, then forward again. You can literally see the wave forming as you go, which means fewer surprises and way more consistency.
Why curling irons usually miss the mark
Not to drag curling irons, but for S-waves, they’re often doing too much.
-
The curl pattern comes out too round
-
The finish feels bouncy instead of sculpted
-
Brushing it out turns into a gamble
Great for beach waves. Not ideal for Old Hollywood energy.
Learning how to curl hair with flat iron gives you a flatter, more controlled curve. The kind that looks polished without looking stiff. The kind Margot would approve of.
About your flat iron situation
If you already own a flat iron that glides smoothly and doesn’t snag, you’re ahead of the game. But if yours pulls, creases, or leaves those awkward clamp marks behind, S-waves are going to feel way harder than they need to be.
And if you don’t own a flat iron at all? Enter the TYME Iron Pro.
Why the TYME Iron Pro actually works for S-waves
This isn’t a random recommendation. The TYME Iron Pro is one of those tools that quietly makes tricky styles feel manageable.
Here’s why it works so well for S-waves:
-
Rounded edges help the hair bend smoothly instead of folding sharply
-
Titanium plates distribute heat evenly, which means more shine and less damage
-
Adjustable temperatures matter, especially for blondes who burn fast and show it faster
-
Fast heat-up means fewer passes and less overall heat on your hair
It’s technically a straightener. Technically a curler. Realistically, it’s the kind of tool that lets you experiment without panicking halfway through.
And yes, blondes, this part is important. Even heat distribution and temperature control are non-negotiable if you want glossy waves instead of fried ends.
The biggest flat iron mistake people make
Trying to rush.
S-waves reward patience. Smooth movements. Clean sections. When your tool works with you instead of against you, that patience feels doable.
And when it doesn’t? That’s when frustration sets in and heat damage follows.

Prep like a professional, because S-waves start before heat
You can have the best technique in the world, but if your prep is off, S-waves will expose you. Immediately. This style is smooth, sculpted, and very honest. Which means dry ends, frizz, or uneven texture don’t get to hide.
Good news. Prep doesn’t need to be complicated. It just needs to be intentional.
Start with clean, fully dry hair
This is non-negotiable. S-waves and even a hint of leftover moisture do not mix.
Damp hair plus heat equals puff, fizz, and waves that fall apart five minutes later. Make sure your hair is completely dry before you even think about plugging in a hot tool. If your hair air-dries with texture, a quick blow-dry pass will help smooth things out and give you a better canvas.
Detangle like you care about your ends
S-waves require smooth sections. Snags and knots turn into weird bends, and once they’re there, they’re hard to undo without starting over.
This is where a gentle tool matters. A brush like the TYME detangling brush helps work through knots without ripping through the hair, especially if you’re blonde or color-treated and already dealing with fragile ends.
Slow. Gentle. Patient. Your waves will thank you.
Heat protection is not optional, especially for blondes
Let’s talk about blonde hair for a second. It’s beautiful. It’s bright. It’s also more vulnerable to heat damage than most people realize.
Lightened hair heats up faster, shows damage sooner, and doesn’t bounce back as easily from mistakes. Which is why a lightweight heat protectant should always come before your flat iron.
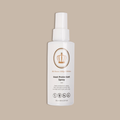
A mist like the Lauren Ashtyn Collection heat protectant moisture hydrate spray gives you coverage without weighing the hair down. You want protection, not slip overload. Heavy oils at this stage can make S-waves fall flat or look greasy before you’ve even finished styling.
Sectioning is the difference between chaos and control
Yes, sectioning takes an extra minute. Yes, it’s worth it.
Break your hair into clean, manageable sections so each wave gets the same attention. This helps keep the S-pattern consistent from root to ends, which is what makes the style look polished instead of accidental.
TYME tip. Smaller sections give you more definition. Larger sections feel softer and more relaxed. Choose your vibe before you start.
Set your temperature with intention
More heat does not equal better waves.
Fine hair, blonde hair, or previously lightened hair should stay on the lower end of the spectrum. Medium to thick hair can handle a little more heat, but even then, you shouldn’t need to max it out.
The goal is smooth bends, not sizzling strands.
Once your hair is prepped, protected, and sectioned, you’re ready for the fun part.
The flat iron S-wave step-by-step tutorial
This is the part where most people overthink it. Don’t. S-waves aren’t about perfection, they’re about rhythm. Once you get the motion down, your hands basically take over.
Let’s get into it.
Step one: Start at the front, always
Face-framing pieces set the tone for the entire look. If these waves hit right, the rest falls into place.
Take a small, clean section near your face. Smaller sections give you more definition. Bigger sections feel looser and more relaxed. Choose your adventure.
Clamp the flat iron near the root, but not on the root. Give yourself a little breathing room.
Step two: Create the first bend
Here’s the key move.
Tilt the flat iron slightly forward, away from your head, and glide down an inch or two. This creates the first curve of your s wave. Think bend, not twist. The hair should follow the iron smoothly, not wrap around it.
Pause for half a second. That pause matters.
Step three: Reverse the direction
Now rotate the flat iron in the opposite direction and glide down another inch or two. You’ve just created the second curve of the “S.”
Forward bend.
Back bend.
That’s the entire pattern.
Repeat this motion down the length of the hair, keeping your movements slow and controlled. This is how flat iron S waves stay smooth instead of creased.
Step four: Leave the ends slightly straighter
This is a modern move, and it makes all the difference.
Instead of waving all the way to the ends, let the last inch or two stay a little straighter. It keeps the look current and avoids that overly done finish.
Old Hollywood, but make it now.
Step five: Repeat, section by section
Work your way around the head, repeating the same motion. Don’t rush. S-waves reward consistency.
If a wave looks off, don’t panic. Let the section cool, then gently redo just that bend. Going over hot hair again and again is how damage sneaks in, especially for blondes.
A quick note on temperature and blonde hair
Blonde hair needs extra respect. Lightened strands heat up faster and hold shape more quickly, which means you can usually work at a lower temperature and still get great results.
If your flat iron has adjustable heat, use it. You want smooth bends and shine, not crispy ends. This is also why tools with even heat distribution, like the TYME Iron Pro, make such a difference when you’re learning how to curl hair with flat iron without overdoing it.
Let them cool. Seriously.
Once you finish a section, leave it alone. No brushing. No finger combing. No “just checking.”
Cooling is what locks the shape in. Touching the hair too soon is the fastest way to flatten an s curl before it even has a chance.

Your sign to master the S-wave
S-waves have a reputation for being high-maintenance, but once you understand the motion, they’re actually one of the most satisfying styles to master. Clean bends. Smooth flow. No guesswork. Just technique, patience, and a tool that works with your hair, not against it.
The beauty of flat iron waves is how versatile they are. Wear them sleek and sculpted for a big night out, soften them for everyday glam, or pin them back when you want something effortless but elevated. They grow with you, and they always look intentional.
If there’s one thing to remember, it’s this. Don’t rush. Let your waves cool. Respect your heat settings, especially if you’re blonde or color-treated. Shiny, healthy hair will always outshine overstyled hair.
And finally, give yourself permission to practice. Nobody nails S-waves on the first try, not even the glam pros. Once it clicks, it really clicks, and suddenly you’ve got a timeless technique in your back pocket.
Because great hair is all about knowing what works, trusting your hands, and showing up with confidence.
Now go create waves that would make Margot proud.