Read Time: 2 min 45 sec
Want to know the secret to almost every Red Carpet, glorious 1970s, and Edward Cullen-Esque hairstyle? Round Brushes
These seemingly intimidating hair tools weren’t invented until the 1960s, but have made a powerful stance in the beauty industry since. Hairstylists all over the world keep round brushes close at hand because of the endless styles they can create when paired with a powerful blow dryer. From runway blowouts to voluminous pixie cuts and even silky straight hair, round brushes are a one-stop-shop for nearly every styling need. Our favorite part? They work with every hair type!
Mastering the use of a round brush does take a bit of practice, but Jacynda Smith, CEO of TYME has gathered the best tips to leave you feeling like you just walked out of the salon!
Ground Rules
Rule #1:
Always use a thermal protectant when applying heat to your hair. We suggest the Upstaged Thermal Protectant. It is essentially a mousse, detangler, thermal protectant, a hair mask, and a texturizer all in one!
Rule #2:
Round brushes come in at the end of your blow-drying time. Hair should be nearly 70% dry before you even pick up your round brush. Your hair should feel cool to the touch before you get started.
Rule #3:
Rotate. Rotate. Rotate. We don’t suggest trying to brush tangles out with a round brush! Round brushes are meant for styling, not brushing. Grab a small section you’re looking to style and place it over the brush. Gently rotate the brush through the length of your hair. Be cautious with larger section sizes because they are harder to maintain and run a greater risk of tangling together.
Rule #4:
Keep your blow dryer pointed away from your roots. Reversing that angle will fluff up your hair cuticle creating tons of frizz.
Creating Your Look
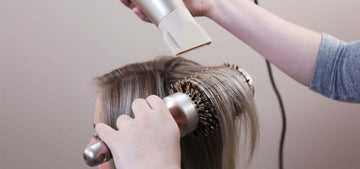
Much like the TYME Iron, the styles you create with a round brush depend greatly on angles! Except these angles come from your blow dryer. Where your blowdryer is placed is the ultimate factor in what style you’ll end up with. We suggest investing in a blowdryer that comes with a condenser like the BlowTYME Hairdryer.
Jacynda said it perfectly in the video above, “Where the hair cools is where it stays.” So if your hair is cooling on the curve of the rounded brush, it will have a curl or wave to it, but if it’s cooling without even touching the brush, it will be straight.
Check out our different TYME approved methods to creating these different looks. And just as a reminder, your round brush should stay at the same angle the entire time you’re styling to keep consistency. Turn the heat up on your blowdryer and let’s get to work!
Looking for Less Volume?
Keep your blow dryer on the inside angle of your round brush. In a gentle and steady motion, rotate (see Rule #3) the round brush through your locks. This method will give you a soft and straight style.
Au Natural?
Keep your blow dryer at a 90-degree intersection with your round brush for a more natural look. This look will still be smooth with a very slight lift and just a glimpse of your natural wave.
Just a Little Bit of Volume?
Keeping your blow dryer to the outside edge of your round brush will give you volume throughout the entirety of the section you’re blow-drying. This method is ideal before styling a polished look like glam waves or an updo.
The Most Volume?
To get a sky-high blowout you’ll want your blowdryer to be blowing your hair back towards you underneath the round brush. Be sure to follow the curve of the brush closely and gently rotate it through your hair. When you get to the end of your length, tightly wrap your hair back into the round brush. Now rotate your round brush 90 degrees and *gently* unwind your locks. Voila! You just took the first step in DIY-ing a gorgeous blowout!
For more tips and hair tutorials, follow us on Facebook, Instagram, YouTube, and Pinterest.


